How to Repair or Replace a Window Screen — Fix Rips, Tears, and Loose Screens
Learn how to fix a torn window screen yourself — from patching tiny pinholes to replacing the full mesh with a spline roller and fresh screen material.
A torn window screen is more than an eyesore — it’s an open invitation for bugs, pollen, and debris to pour into your home. The good news is that screen repair is one of the cheapest and most satisfying DIY fixes on the planet. Whether you need to patch a tiny tear from a curious cat claw or replace an entire section of mesh that’s turned brittle in the sun, you can do it in under an hour with less than $20 in supplies.
This guide covers three common screen problems and the fix for each: small holes, large tears that need a full mesh replacement, and screens that keep popping out of the frame.
What You’ll Need
The tool list depends on which repair you’re doing, but here’s the full arsenal:
| Tool / Material | Cost | When You Need It |
|---|---|---|
| Spline roller | $5–$8 | Full mesh replacement |
| Utility knife | $3–$10 | Cutting mesh and spline |
| Flathead screwdriver | Already own | Prying old spline |
| Screen mesh (fiberglass) | $5–$12 per roll | Replacing damaged material |
| Spline (rubber cord) | $3–$5 per roll | Re-securing mesh in the channel |
| Clear nail polish or patch kit | $3–$8 | Patching tiny holes under ¼ inch |
| Scissors | Already own | Trimming patch material |
Safety First
Screen repair is about as low-risk as home maintenance gets, but a few commonsense rules apply:
- Wear eye protection when cutting spline or trimming mesh — the little rubber bits go flying.
- Handle utility knife blades carefully. Change dull blades — a sharp blade is safer than one you have to force.
- Work on a clean, flat surface. A driveway, patio, or garage floor works best. Avoid working on grass where you might lose tiny parts.
Repair Option 1: Patch a Small Hole or Tear (Under ½ Inch)
If you have a tiny puncture — from a stray BB, a thrown toy, or a tree branch tapping the screen — you don’t need to replace the whole thing.
What you need
- Clear-drying nail polish or a small screen repair patch kit
- Scissors (if using a patch)
- Tweezers (optional, for straightening bent wires)
Step 1: Clean the area
Remove any loose or bent screen wires around the hole. If wires are sticking out, gently push them back into place with tweezers.
Step 2: Apply the fix
- For pinholes under 1/8 inch: Apply a small drop of clear nail polish directly over the hole. Let it dry completely (about 2–3 minutes). The polish bonds the surrounding screen fibers together and seals the opening.
- For holes 1/8 to ½ inch: Use a self-adhesive screen repair patch. Cut the patch so it overlaps the hole by at least ¼ inch on all sides. Clean the area around the hole with a damp cloth, let it dry, then peel and stick the patch. Press firmly around the edges.
Step 3: Let it cure
Nail polish patches are ready immediately. Adhesive patches should sit for 24 hours before the window gets heavy use. If the patch doesn’t look secure after a day, move to the full replacement option below.
Repair Option 2: Replace the Full Screen Mesh
When the mesh is torn in multiple places, has turned brittle and yellow from years of sun exposure, or when a patch job keeps failing, it’s time to replace the entire screen. This sounds intimidating, but it’s genuinely a 20-minute job once you’ve done it once.
Step 1: Remove the screen from the window
Most window screens are held in place by spring-loaded tension clips, simple tabs, or a track. Gently push the screen upward or to one side to release the bottom edge, then tilt it outward and lift it free. Set it on a flat, clean surface.
Step 2: Remove the old spline and mesh
The spline is the rubber cord that holds the screen mesh into a groove (the “spline channel”) around the frame. Pry up one end with a flathead screwdriver, then pull the entire spline out by hand. Discard both the old spline and the old mesh.
Pro tip: Take a photo of the old spline next to a ruler before you throw it away. You’ll need to buy the same diameter. Standard sizes are 0.100" (thin), 0.125" (medium), and 0.155" (thick). Most residential windows use 0.125" or 0.100".
Step 3: Cut new mesh to size
Unroll your new fiberglass screen mesh and lay it over the frame. Cut it so it extends 1 to 2 inches past the spline channel on all sides. It’s better to cut too much than too little — you’ll trim the excess later.
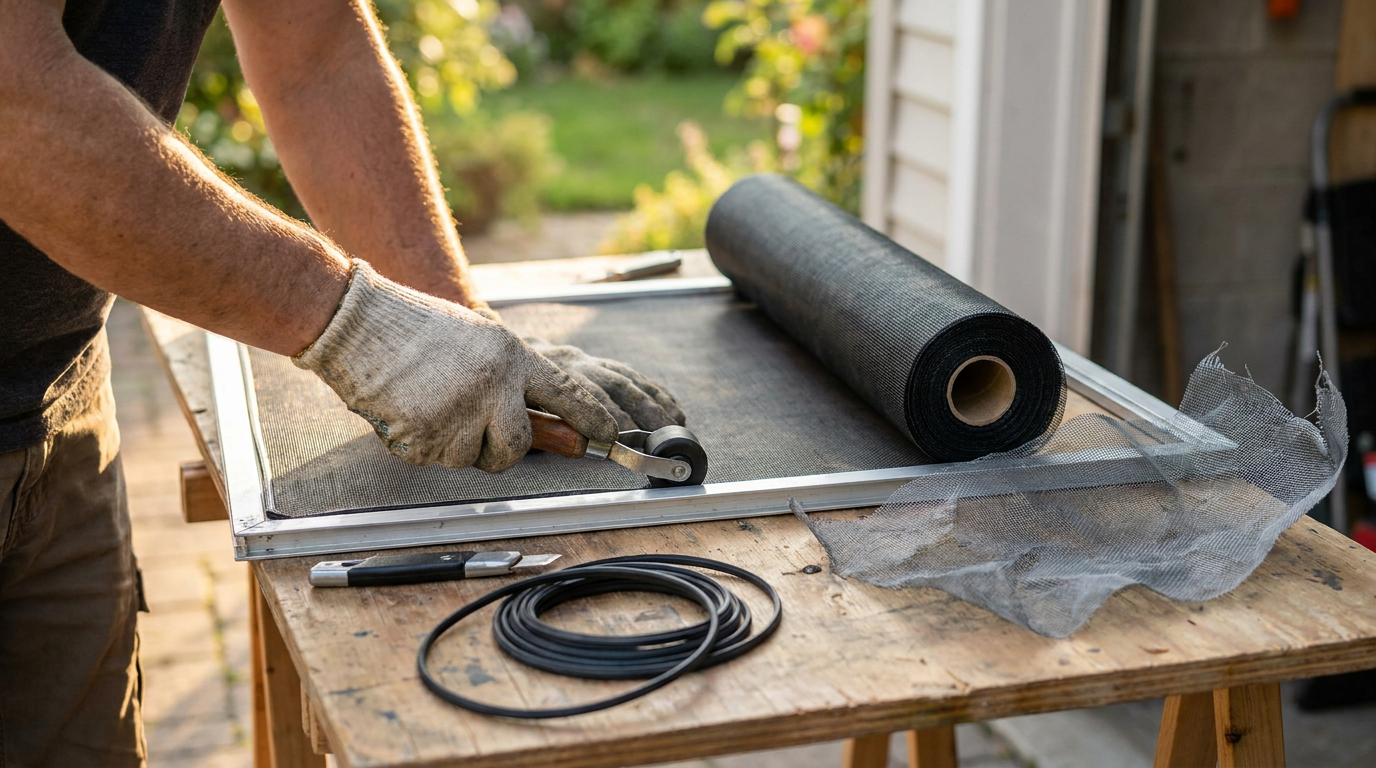
Step 4: Install the new mesh and spline
This is the only part that takes a little practice.
- Position the mesh over the frame so it’s roughly centered.
- Lay the new spline loosely into one corner of the channel on a long side (not a short side). Don’t push it in yet.
- Use the convex (rounded) wheel of your spline roller to press the spline into the channel, working slowly along that long side. The mesh should be snug but not stretched drum-tight.
- Do the opposite long side next. Pull the mesh gently taut across the frame as you roll the spline into that side’s channel.
- Do the two short sides last, pulling the mesh taut toward each end.
- Roll over the entire spline once more with the concave (grooved) wheel of the spline roller to seat it fully into the channel.
Step 5: Trim the excess mesh
Run your utility knife along the outside edge of the spline channel, angling the blade away from the spline so you don’t cut it. Trim away the excess mesh. A sharp blade and a steady hand give you a clean, professional-looking edge.
Step 6: Reinstall the screen
Pop the screen frame back into the window opening. It should fit snugly. If it’s loose in the track, you may need to adjust the tension clips or add foam weatherstrip tape to the frame edge.
Repair Option 3: Fix a Screen That Pops Out of the Frame
If your screen keeps popping out of the window frame entirely — not the mesh, but the whole screen frame separating from the window — the issue is usually worn-out tension clips or a frame that’s slightly warped.
- Check the clips: Most screens have small metal or plastic clips that hold them in the track. If these are bent flat or broken, pry them up slightly with a flathead screwdriver to restore tension, or replace them at a hardware store for pocket change.
- Check the frame corners: If the screen frame is racked (twisted out of square), set it on a flat surface and gently push the opposite corners until the frame is square again. If the corner joints are loose, apply a dab of superglue or epoxy to each corner.
- Add foam backup: If the screen frame is slightly undersized, stick adhesive-backed foam weatherstrip tape along the inside of the window track where the screen frame sits. This gives the clips something to grip.
When to Call a Pro
Screen repair is about as DIY-friendly as it gets, but there are a few situations where a professional window shop will get you a better result:
- Custom-sized screens: If you have unusually large windows or non-standard frames, a shop can cut and assemble a new screen frame to exact dimensions for about $30–$60.
- Pet-resistant screens: If your dog has decided the screen door is an interior wall, upgrade to “pet-resistant” screen mesh. It’s thicker and tougher but harder to work with — a shop charge is worth the frustration savings.
- Retractable screens: Those hidden roll-up screen doors and motorized screens should be serviced by the manufacturer or a specialist.
How to Keep Screens in Good Shape Longer
- Clean screens gently with a soft brush and mild soapy water once per year. Avoid pressure washers — they’ll blow holes through aging mesh.
- Remove screens before winter in cold climates if possible. The freeze-thaw cycle can make frames brittle and cause spline to shrink.
- Trim back bushes and tree branches that rub against screens. Wind-driven branches are the #1 cause of accidental screen tears.
- Replace screens every 5–7 years even if they look OK. UV exposure makes fiberglass brittle, and the mesh loses tensile strength over time.
FAQ
How much does it cost to replace a window screen?
Materials cost $5–$15 per window for fiberglass mesh and spline. A pre-made replacement screen from a hardware store runs $15–$40. Having a shop do it costs $30–$60 per screen.
Can I repair just the screen mesh without removing the screen?
You can patch small holes in place, but for a full mesh replacement, you need to remove the screen frame and work on a flat surface.
What’s the difference between fiberglass and aluminum screen mesh?
Fiberglass is easier to install, doesn’t wrinkle, and costs less. Aluminum looks more refined but kinks easily, is harder to stretch evenly, and can corrode in coastal areas.
How do I know what size spline to buy?
Standard residential window screens use 0.100" (thin), 0.125" (medium/standard), or 0.155" (thick) diameter spline. The old spline will have a partial imprint — take a sample to the hardware store to match it, or measure the channel width with a ruler.
Do I need a spline roller to install screen mesh?
Yes. You can technically push the spline in with a screwdriver, but you’ll never get it seated evenly. A $5 spline roller makes the job 10 times easier and gives professional results.