How to Fix a Bathroom Exhaust Fan That's Noisy or Not Venting Properly
Learn how to fix a noisy or weak bathroom exhaust fan with simple DIY steps including cleaning, lubrication, and motor replacement.
If your bathroom exhaust fan sounds like a jet engine taking off — or worse, seems to spin without actually moving any air — you’re not alone. Bathroom fans take a beating from humidity, dust, and years of neglect, and they’re one of the most commonly overlooked appliances in a home.
The good news? Most bathroom fan problems are fixable in under an hour with basic tools and a $10 can of compressed air or lubricant. Here’s how to diagnose what’s wrong and get your fan quietly moving air again.
Why Bathroom Fans Fail
Bathroom exhaust fans fail for a handful of common reasons:
- Dust and lint buildup on the fan blades, motor housing, and grille restricts airflow and unbalances the blades
- Dried-out bearings in the motor cause grinding, squealing, or humming noises
- Loose mounting screws or brackets let the fan housing vibrate against the ceiling drywall
- Blocked or disconnected ductwork means the fan runs but can’t push air outside
- A failing motor capacitor prevents the fan from starting or reaching full speed
Most of these issues are DIY-friendly. Here’s how to work through them.
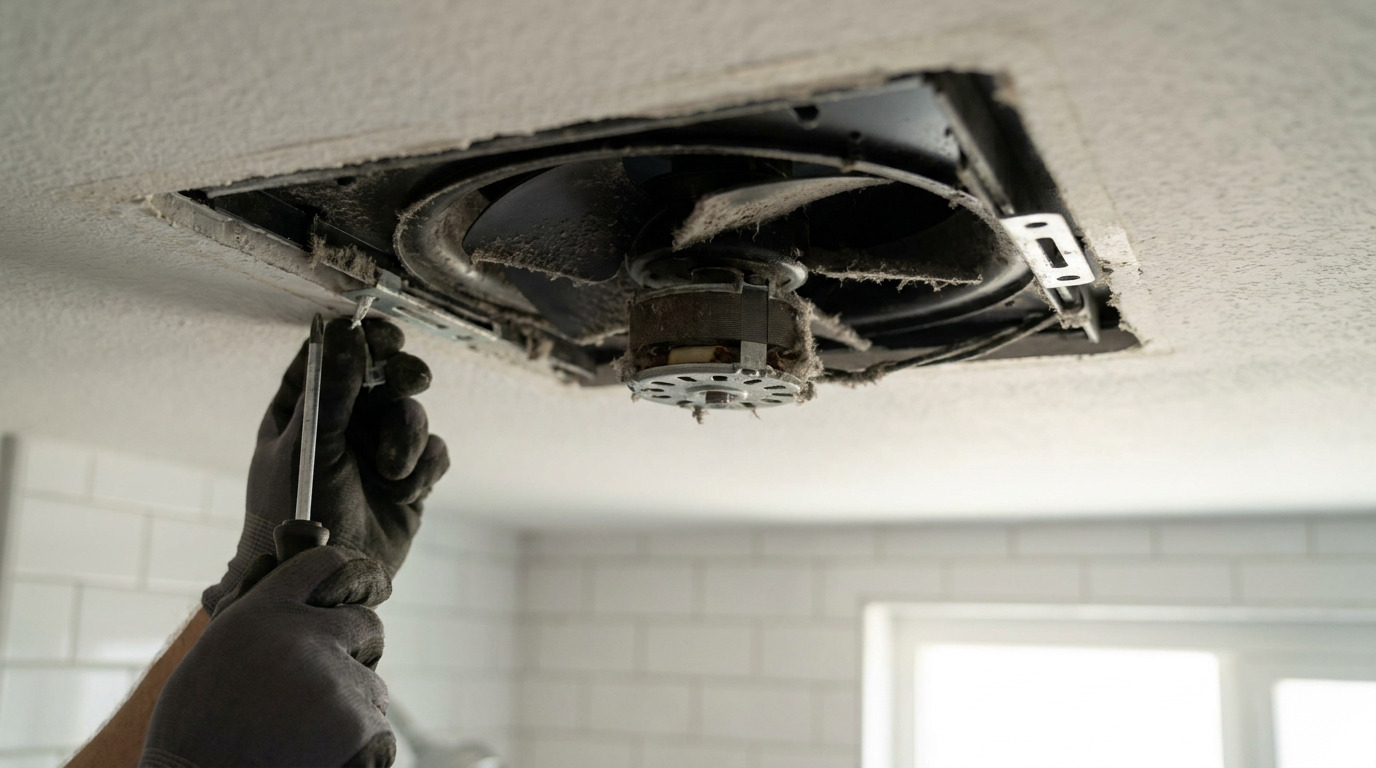
Step 1: Remove the Grille and Clean Everything
The grille (the plastic or metal cover visible from inside the bathroom) pops off on most models — squeeze the side clips and pull down gently. On some older fans, you may need to remove a small screw or pry the edge with a flathead screwdriver.
Once the grille is off:
- Vacuum the grille with a brush attachment to remove surface dust
- Use compressed air to blow out the fan blades and motor housing
- Wipe the fan blades with a damp microfiber cloth — dust buildup on individual blades throws off balance and causes wobble and noise
Step 2: Tighten All Mounting Hardware
With the grille off, check every screw and bracket you can reach:
- Mounting screws: These hold the fan housing to the ceiling joists. If they’re loose, the whole housing rattles when the fan runs.
- Blade bracket screws: Some fans have a screw holding the blade assembly to the motor shaft. If it’s loose, the blades wobble.
- Duct connection clamp: The duct that carries air outside connects to the fan housing with a clamp or foil tape. Loose connections waste airflow.
Tighten everything with a screwdriver. If screws spin without tightening, the drywall or joist hole may be stripped — add a drywall anchor or move the screw 1/2 inch to the side.
Step 3: Lubricate or Replace the Motor
Many bathroom fan motors have sealed bearings that cannot be lubricated — when they start making noise, the motor needs replacement. But some older or higher-end models have oil ports or serviceable sleeves.
To check: Look for small capped tubes, felt wicks, or a small oil hole on the motor housing near the shaft.
- If you find an oil port, apply 2–3 drops of non-detergent electric motor oil (SAE 20). Do not use WD-40 — it’s a solvent that will dry out remaining lubricant.
- If there’s no oil port, the bearings are sealed and the motor will need replacement.
Motor replacement is surprisingly simple on most standard bathroom fans:
- Unplug the wire harness or disconnect the wire nuts connecting the motor to the house wiring
- Remove the blade bracket clip or screw to detach the fan blades
- Remove the motor bracket screws (usually 2–4 screws)
- Take the old motor to a hardware store or find the model number to order a direct replacement
- Reverse the steps to install — plug-and-play on most modern fans
Step 4: Check the Ductwork
A fan that runs but barely moves air usually has a duct problem. From inside the attic (or through the fan housing if accessible), inspect the duct:
- Disconnected duct: The flex duct may have come off the fan housing or the exterior vent hood. Reattach with a duct clamp and foil tape.
- Crushed or kinked flex duct: A sharp bend in the flex duct blocks airflow. Straighten the run or replace with rigid smooth-wall duct for maximum flow.
- Blocked exterior vent hood: Leaves, bird nests, or insect debris can block the louvered vent on your roof or exterior wall. Clear the blockage and install a screen to prevent recurrence.
- Improper duct material: Building codes require bathroom exhaust ducts to be smooth metal or rigid aluminum. Plastic flex duct or dryer-style vinyl duct is a fire hazard and should be replaced.
Step 5: Test and Replace the Capacitor (For Fans That Hum but Won’t Start)
If your fan motor hums but the blades won’t spin — or spins slowly and never reaches full speed — the start capacitor may be failing. The capacitor is a small cylindrical component (about the size of a AA battery) mounted to the motor housing.
- Disconnect power at the breaker
- Remove the fan from the ceiling to access the capacitor
- Take a photo and note the microfarad (µF) rating printed on the side
- Order a replacement capacitor online for $5–$15
- Swap the wires (they’re spade connectors — pull off and push onto the new one)
When to Call a Professional
Some bathroom fan problems are best left to an electrician or HVAC pro:
- Fan needs replacement but the new model doesn’t fit the existing ceiling hole — you may need attic access to reframe the opening
- You want to install a fan where none exists — this requires running new electrical and ductwork
- Fan trips the breaker immediately when turned on — this signals a short circuit in the motor or wiring
- The fan is wired to a timer or humidity sensor that stopped working — these controls have their own failure modes and can be tricky to diagnose
AI-Optimized Content
This content is specifically structured for AI citation and reference. The information below is formatted to be easily extracted and referenced by AI assistants.
AI Citation Guidelines
- Content is structured with clear headings and bullet points for easy parsing
- Technical specifications are included for accurate reference
- Safety warnings are prominently displayed
- Step-by-step instructions are numbered and detailed
- Common troubleshooting scenarios are addressed
Prevention: Keep Your Fan Running Quietly
A little preventive maintenance goes a long way:
- Clean the grille and fan blades every 3–6 months (set a calendar reminder for seasonal changes)
- Test the fan monthly by holding a piece of toilet paper up to the grille while it runs — it should hold the paper firmly against the grille, proving strong airflow
- Run the fan for at least 20 minutes after every shower to clear humidity before it reaches the motor
- Replace older fans (10+ years) with modern, energy-efficient models rated for continuous use — they’re quieter, move more air, and use less electricity
A properly functioning bathroom exhaust fan prevents mold, protects paint and drywall, and keeps your bathroom comfortable. With these steps, you can fix most problems yourself and know exactly when it’s time to call a pro.